Wednesday, November 10, 2010

Lady Grey Update

I'm fully aware that I started my Lady Grey coat nearly two months ago...and it isn't finished. As a matter of fact, I don't believe I've touched it in almost a month.

Everything was going fine and I was trucking along for quite some time (largely due to the fact that I decided to forgo some of the more indepth tailoring since I'm not using heavy material), I finished my bound button holes (with Daniel's help), then WHAM! Disaster struck.

I am in love with my button holes (again, thanks to Daniel and his ability to draw straight lines). Since I couldn't find matching silk organza or a suitable substitute, I opted for the simplified bound button hole. I was so very happy with the result,


relieved that I decided to do fabric covered buttons with the lining fabric (super easy with the Dritz kit),


and thrilled with my beautiful top stitching


that it was a very long way to fall when I realized the mistake...


Yes, the button is on the wrong side of the front piece...on both of them. I've poured over the pattern and directions time and time again, but I can't figure out what I read incorrectly. I'm 99% sure it was my mistake since everyone else in the sew along seems to have gotten it correct...but I can't figure out how you would get to the correct placement from the pattern.

I have enough fabric to redo the front pieces, but I have no interest in ripping out allllll those seams (remember, top stitching everywhere) and starting over. So there it sits, half finished, an eye sore, and a huge bummer. I tried to just push through and managed to get most of my lining finished...but it's just such a downer that I've lost interest.


The worst part - I promised my sister I'd finish it before I visit at Thanksgiving so she could admire it and be jealous of what an incredible seamstress I am ;) Total fail?

Monday, October 11, 2010

Catching Up

It's been a while since I last posted as I've been frantically trying to wrap up a handful of projects, and it will probably be another short while until I post again.

I'm fully aware that it is only October 11th, but for those of us giving all handmade gifts, Christmas is right around the corner. I have wisely (ha) decided to undertake 20 projects before Christmas (and some of those before Thanksgiving to save on shipping), and have completed 4 3/4. I also have Halloween costumes to finish...before Halloween...and I have the Lady Grey Sew Along mixed in there as well.

Things are getting done though. I made the slip cover for our guest room (my sewing room/office) sofa bed:


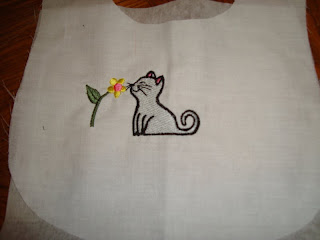
I finished the bibs for the baby gift:


Ann is on her stand and ready for draping projects (that was more Daniel than me, but whatever):


And this is where I am on my Lady Grey coat:


All pieces are cut and serged, folded neatly, and sitting in a stack. My fusible interfacing should be here today (didn't realize I didn't have enough until I went to use it), so I'll probably start assembling tonight.
I made my first attempt at a bound buttonhole last night and while it definitely didn't come out presentable, I know what I did wrong and think my next attempt will go better. Once I'm happy with the outcome, I'll go ahead on the jacket.
I'm also not sold on my button choice. I had no idea what to do, so I just picked up something that would "work" to fill the space. Maybe I should try a fabric covered button to match either the shell or lining? Thoughts? Suggestions?

In my "finished" stack there are also those presents that are finished, but I can't post pictures...I believe in surprise too much to risk having to make something else just because the cat got out of the bag ;)

Monday, September 27, 2010

The Beauty That is My Sewing Machine

I realized some time ago that I was definitely not taking full advantage of my MemoryCraft machine, and actually started feeling a little guilty every time I used it to baste my muslin or sew in a zipper. Sitting in front of me was a MemoryCraft Professional Embroidery machine, and I'd never embroidered a stitch.

Yesterday, I rectified that problem. My sister's brother-in-law and his wife are expecting and due in November, so I decided to make them some booties and bibs. I made four pairs of 3seam booties yesterday (very easy) and the beginnings of four bibs - the bibs being the exciting part.


(My box o'booties)


I played around with doing multiple images on one bib in these


I'm not sure I used the right kind of stabilizer. I was planning to use a lightweight interfacing to leave in permanently since it's on a very lightweight broadcloth, but only had medium so gave that a try. There are some wrinkles, but I'm not sure if it's because I had such a hard time getting the fabric taught in the hoop, the stabilizer, or something else completely. Thoughts?

Wednesday, September 22, 2010

Double, Double, Toil, and Trouble

Halloween is right around the corner, so I'm starting on costumes. Last year we had a last minute scramble to come up with something fun for the Halloween dance and decided to plan this year's that night also. So while dancing around Regent Ballroom as Erik and Christine from Phantom of the Opera...

(Daniel had the mask and everything, but had to take it off so
he could navigate the traveling dances)

...we were deciding that this year we would go as Don Lockwood (Gene Kelly) and The Lady in Green (Cyd Charisse) from Singin' in the Rain.


Singin' in the Rain is probably my absolute all-time favorite movie, and the Broadway Melody dream sequence is one of my favorite scenes. The music is fun, the costumes are great, and the cheesy over-acting makes me smile. Daniel hates watching this movie with me because I recite every line and sing along with every song...but it just makes me happy. I can think of nothing better than to spend a fun night dancing as "them." I only hope we do their memories justice.

Daniel's costume is pretty easy - he owns khaki pants, I've finished all but the buttons on a bright yellow vest for him, I'm ready to make the pink tie, and he'll have to make due with a white shirt because I'm not making him a yellow/white striped shirt for one-time use.

My costume will be my very first draping project. I'm just using some Kona Cotton so I don't have to worry about funny stretching draping with knits, but I still don't really know what I'm doing. And, as I'm not known internationally for my fabulous gams, I'll be lending a little more coverage to the dress :) I need to buy some pretty sequined spangles to adorn the dress with (and make a matching choker), and still need a zipper....but I'm ready to start planning!

Sunday, September 19, 2010

And We're Off!!


The Lady Grey Sew Along started this week and we're currently at our muslin/fitting stage. Thankful that I could save some money by using some old drapery fabric from Mom's stash, I set out to make my muslin. As I said before, this if the first time I've ever followed this golden rule of sewing, but I'm definitely seeing the benefit already.

I finished mine Friday evening and put the pictures up on our Flickr pool to get feedback as I am 100% new to coats and tailoring. At first look, I was thrilled (remember that the collar and lapel have the seam allowances showing, so they'll be smaller by 5/8" all around). I was also a little thrown by the incredibly uncomfortable sleeves. That is, until I realized that there was a left sleeve and a right sleeve (would have been helpful for them to mention that), and I definitely had them in backwards, which is why they look so crumply.


Then I turned around...


I knew the fit was close, but couldn't quite figure out what was going wrong across the back. So, I waited and checked for feedback every hour or so until I saw the suggestions that the coat was a little long in the waist, which makes perfect sense as I am child-sized :) I brought it up about 1/2" all the way around to test the theory and was delighted with the result. As I had additional suggestions to try some light shoulder pads to help with the extra space across the shoulders but still allow free movement, I tacked in some 1/4" shoulder pads. I also took the time to switch the sleeves and was pleased to find that that was precisely the problem. Once I had those turned up to the planned 3/4 length, they didn't even look so overpowering on my little arms, either.


(Those are excited little fists because all the changes worked, FYI)

I am so glad I decided to do the sew along now that I'm into it, and I definitely think it was a worth-while splurge. The feedback from more experienced sewists has been invaluable (and we all know I would never have done the muslin otherwise), and it's so fun to see what fabrics, etc everyone else is working with! AND, it doesn't hurt that through this I've connected with another little sewist in IL who is also 4'11 :) Maybe I'm not so strange afterall...

Thursday, September 16, 2010

Bundle Up!

I love it! It's cooling down, the leaves are changing, the sun feels nice and warm rather than like a high intensity heat gun. I don't know if you can feel it, but I sure can and I'm loving it! Of course, this means the next step is BRRR, which I could probably skip. And, as we all know, with BRRR comes blankets!

A friend approached me last week about making a blanket for her mom's birthday present. Of course, I was flattered and agreed immediately (I actually agreed to making something before she told me what it was...bad plan, I know). I've spent the last week learning how to do free-motion quilting, or stippling, and practicing a LOT. My practice blanket is a baby blanket for someone in the family. I only did enough to practice the stippling before I put that on hold and attacked the one for my friend since it has a deadline.

I pinned the backing to the rug instead of taping it to my floor...


I pinned out the layers every 2-3 inches starting in the center...


Then hand-basted some lines and started quilting! I did one column before moving on to my friend's (as you can see, I had a LOT of help)...


And if you look at the square directly above her, you can see some of my quilting...


That blanket is just light-ish cotton. The one for my friend is flannel, making it a little trickier. I am almost finished. I need to tied off the thread ends, possibly add a little stitching, and add the binding. What do you think?? Not too shabby for my first try?


Wednesday, September 15, 2010

Meet Ann

Yes, she's finally finished (well, except for the stand). After many grueling hours of labor, we can welcome Ann to the world. Since I replaced my middle name with my maiden name when I got married, I decided to name her Ann to remind myself of where I was when I started sewing. I know, I'm so sappy.

I spent yesterday afternoon covering her in some fleshy stretch nylon - not fun - and pinning it down where it doesn't quite follow the curves. Daniel is planning to build a base for her so we can attach her to one of our lighter tripods we have around the house. Then she'll be adjustable!!


Can't wait to start using her!!!

Tuesday, September 14, 2010

Photoshoot!!

Fully aware that complaints have been flying around about all my pictures being of my projects on hangars, I decided to take advantage of the beautiful weather this weekend and rectify the problem!

I grabbed Daniel and we spent Saturday afternoon in a park doing a little photoshoot...and I got to re-educate myself on the skirt-under-dress-etc changing technique as I changed either standing outside of my car of in the backseat :) Enjoy!


Simplicity 2501 and my upcycled skirt


Brocade Skirt (and Ann Taylor LOFT shirt)

(I was annoyed with the wind...stupid Midwest)
(Note: that gorgeous necklace was handmade by Andromeda's Charms)


Butterick 5354 and Denim Skirt


Needless to say, we had a great time! Hope you enjoy the shots!!